Software User Guide
User guide and documentation for Smart Shooter
Table of Contents
A. OVERVIEW
1. Quick Start Up
a. Open, Connect & Save
OPEN Open the Software
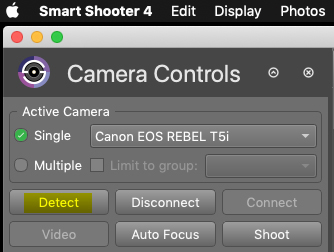
CONNECT Connect a cable to your camera and computer, turn on the camera, SS 4 will auto-detect. Under Active Camera the connected camera will appear.
If camera is not yet detected, in the Camera Controls panel click Detect, then Connect.
4. SAVE Choose where images will save. Options are:
Disk (computer) Images will download to the computer only.
Card (camera memory card) Images will save to the card only, a “blank” thumbnail will appear in the Filmstrip, you may right-click the image and select “download”.
Both (computer + memory card) Images will save to both the memory card in the camera and will download to the computer.
Select your Storage choice in the Camera Controls Panel

b. Taking and Viewing Photos
Trigger the shutter by clicking the Shoot button

located in the Camera Controls Panel, or by manually operating the camera. When Live View is enabled, most cameras will disable manual control, hence triggering is only possible by using the Shoot button.
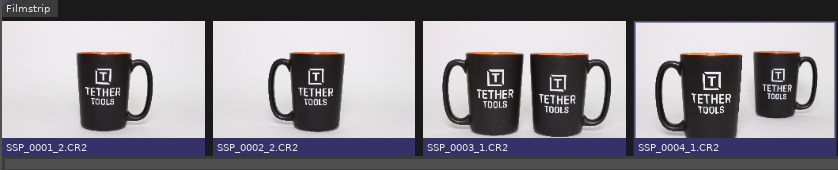
As each image is taken, the thumbnail of your image will appear in the Filmstrip Window and the image will appear in the Preview Window for review. Click on any previously taken image to view in Preview Window.
If you have Recent Photos Panel open, the images by their file names will appear in a list. Recent Photos Panel can be enabled or disabled by going to Display in the navigation. (Recent Photos Panel is enabled by default when first starting SS4)
Recent Photos Panel listed by file name. Click the X to close panel.

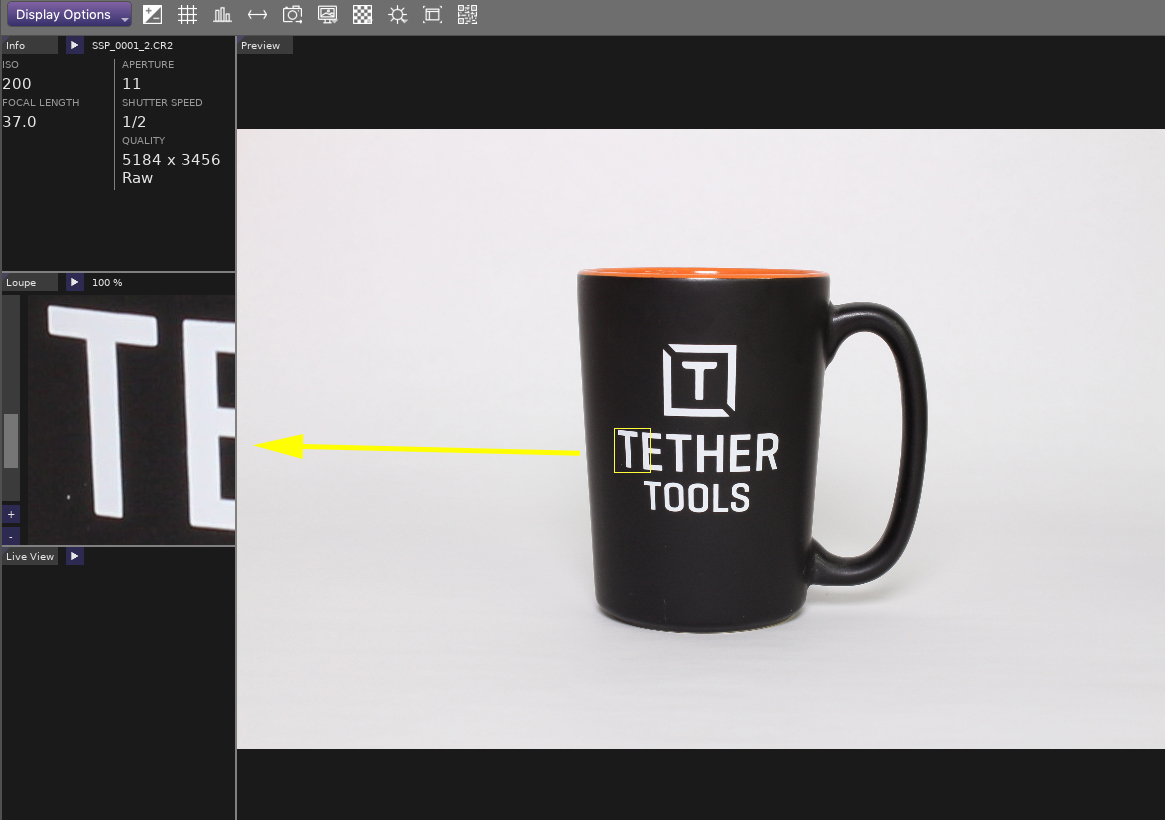
In the Display options in the Capture Window you can enable/disable the Quick Loupe - Show in Preview and Show in Live View and adjust the size with a slider.
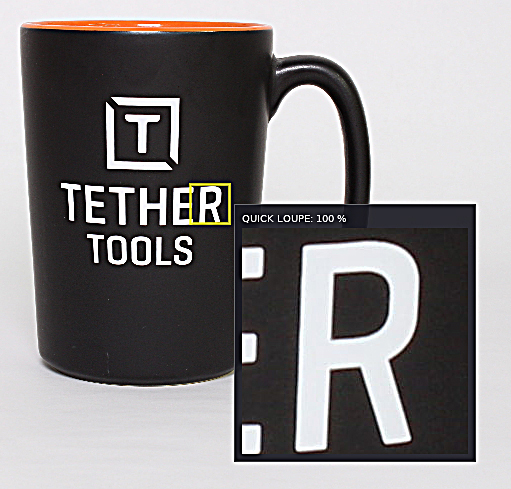
The Loupe Window shows a magnified view of the photo. The yellow box in the Preview Window represents the current area shown in the Loupe Window. You can use the mouse to click/drag the yellow box to reposition the magnified area, or you can use use the mouse to click/drag the magnified image directly in the Loupe Window.
c. How to Use Live View
To turn Live View ON, check Enable in the Live View section in the Camera Controls Panel.

Live View will fill the Preview Window
Check Zoom to switch the Live View output to a magnified box in the Live View Display, it can be moved using the cursor. Use the small, medium and large arrows for focusing control.
If your camera supports Live View Depth of Field Preview, you can enable it using the DOF checkbox.
Hover over the stationary yellow outlined box on the image to turn it to the Live View Loupe.
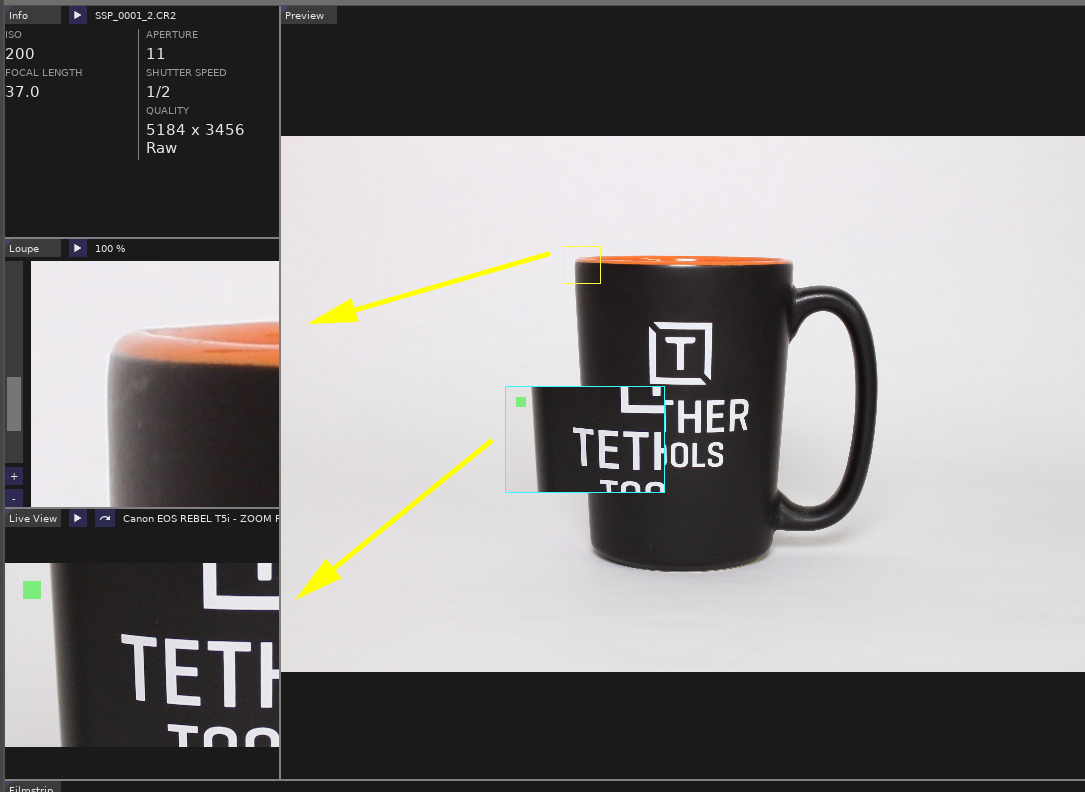
The close-up view will appear in the Loupe Window.
The Loupe Window only ever shows a magnified area of the last photo shown in the Preview Window. It does not magnify the Live View image.
So if Live View is full screen (ie. you cannot see the last taken photo), then the contents in the Loupe Window will still show the last photo.
Separately to this, if you hover the mouse over the Live View image, it will show the Live View Quick Loupe.
2. Panels
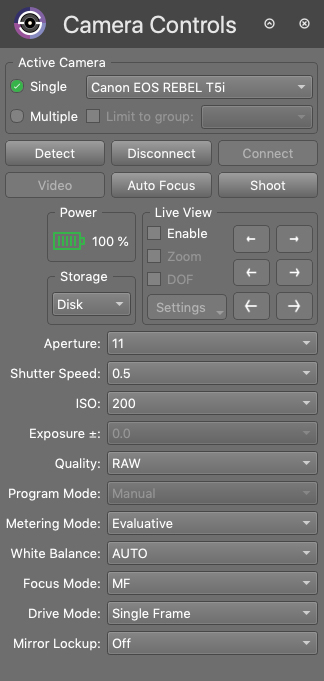
a. Camera Controls Panel
Active Camera: Identifies camera in use.
Detect: Smart Shooter will automatically detect the camera. Press Detect to force the software to check for cameras.
Disconnect: Immediately disconnects camera.
Connect: Press Connect to connect to your camera. Auto-connect by default.
Video: Switch camera to video mode, then click Video to start recording, click to stop.
Auto-Focus: Auto-focuses lens on camera.
Shoot: One click triggers the shutter one time.
Power: Shows the battery level on the camera.
Storage: Set download location.
Live View: Enable, Zoom, Dof Settings See How to Use Live View
Camera controls available with drop down menus:
Aperture
Shutter Speed
ISO
Exposure Compensation
Quality
Program Mode
Metering Mode
White Balance
Focus Mode
Drive Mode
Mirror Lockup
b. Recent Photos Panel
If you have Recent Photos Panel open, the images by their file names will appear in a list. Enable or diable Recent Photos Panel by going to Display in the navigation. (Recent Photos Panel is enabled by default when first starting SS)

Recent Photos Panel listed by file name. Click the X to close panel.
3. Tabs
a. Capture Tab
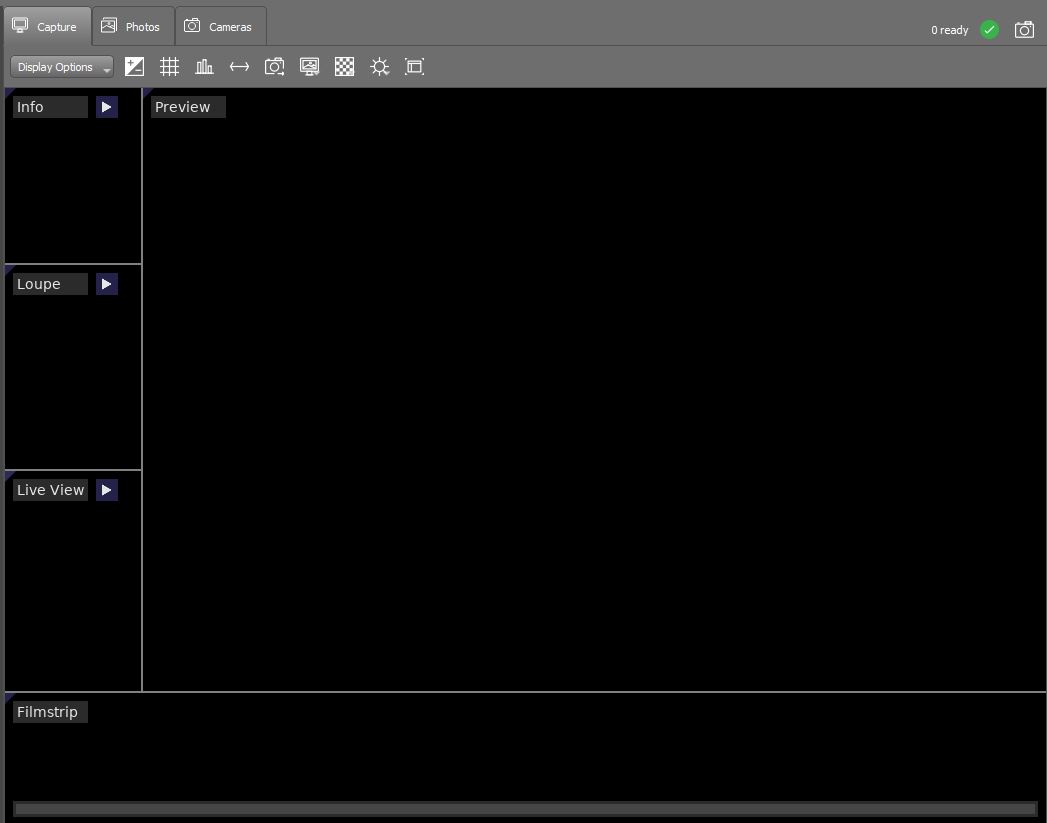
The Capture Tab is your main working space, with five windows:
Preview Window - with Quick Loupe mode (mouse hover). Immediately after images are shot, they will appear in Preview for review.
Info Window - image metadata.
Loupe Window - magnified view, click and drag cursor in Preview to move.
Live View Window - the zoom region can be repositioned by mouse click/drag.
Filmstrip - thumbnails of recently taken images. Click on image to open in Preview.
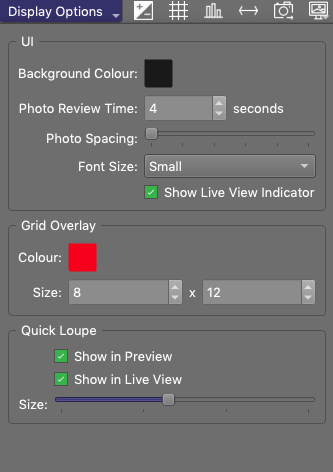
Click Display Options button to open where you can control how the User Interface appears.
Background Color, Photo Review Time, Photo Spacing, Font Size & Show Live View Indicator
Grid Overlay - Color & Size
Quick Loupe - Show in Preview, Show in Live View & Size
The Icons from left to right above the windows in the Capture Tab:
The icons are:
Over or Under Exposure
Grid Overlay
Photo Histogram
Live View Mirror
Client Presentation Mode
Background Image
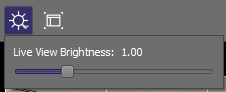
Live View Opacity
Live View Brightness
Fullscreen Display
Hover over each icon to read its description, see example below for Over/Under Exposure, shown as #1 in the list above.
To use Background Image, shown as #6 in the list above Setting a background image is useful when you need to match a new shot with a previously taken shot.
Enable Background Image : Check Enable, then click Select Background to choose an image.
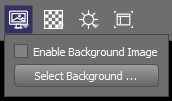
Live View Overlay : Click to set the Opacity of the Live View to see the background image behind the Live View. Best used for perfect alignment across images.
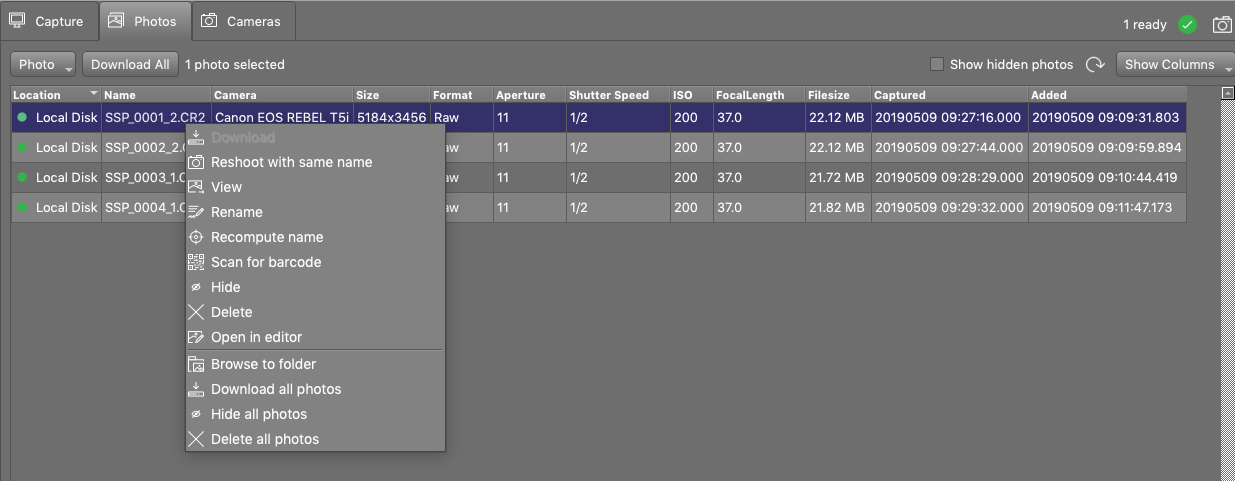
b. Photos Tab
Images taken detail list:
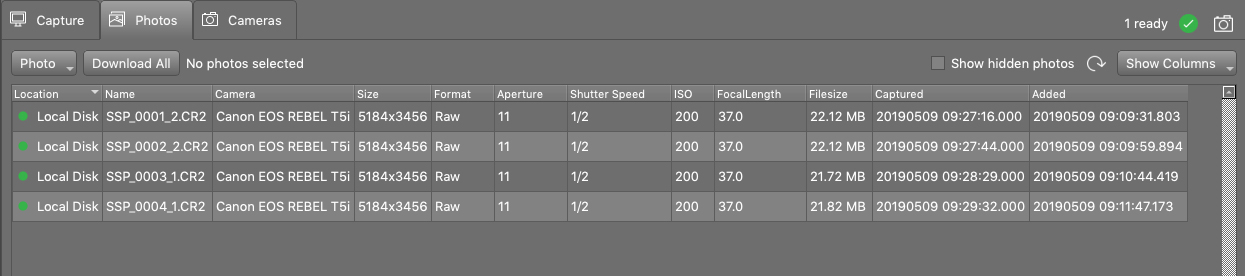
Highlight image in list, then right click for additional options.
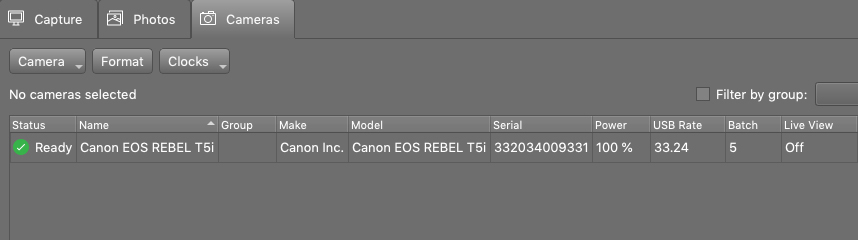
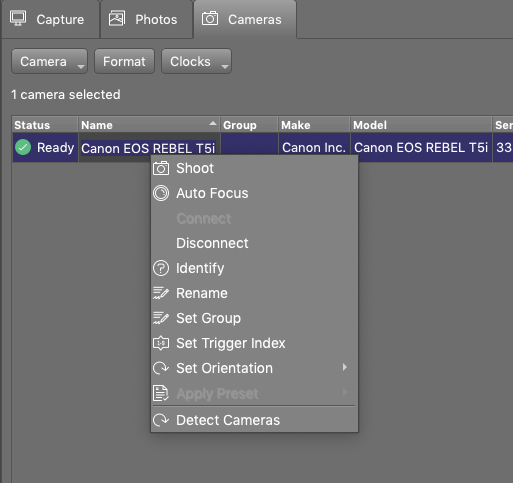
c. Cameras Tab
Detail list of cameras connected.
Highlight camera in list, then right click to access further features.
4. Navigation
a. File
Access tethertools Options Window for General settings and the Name Policy settings: The Name Policy is where you specify how you want your file names to appear.
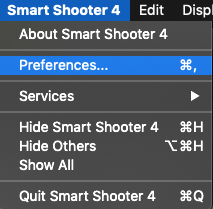
On a PC File > Options
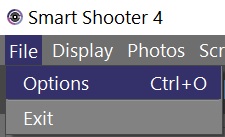
On a Mac Smart Shooter 4 > Preferences then Options
(Options in Smart Shooter PRO version include General, Name Policy, Barcode and External API)
Options in Smart Shooter Standard version include General and Name Policy:
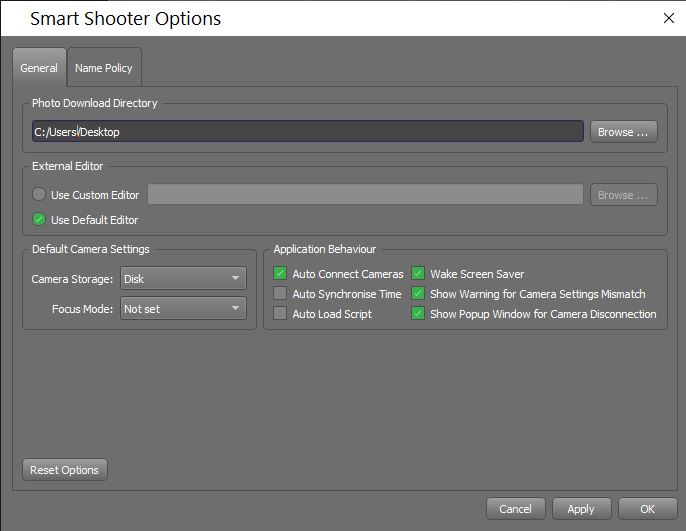
Under General:
Photo Download Directory - Browse to where you want to store images on the computer. It is possible to set subdirectories by including a / directory separator.
External Editor - Select your external image editing program.
Default Camera Settings - Camera Storage, Select where to save images. Focus Mode
Application Behavior - Check boxes for : Auto Connect Cameras, Wake Screen Saver, Auto Synchronize Time, Shown Warning for Camera Settings Mismatch, Auto Load Script, Show Popup Window for Camera Disconnection
For changes to take effect, Click Apply for changes to take effect immediately OR click OK for changes to take effect AND close window. Click Reset Options button to revert to default settings.
Under Name Policy:
To view the full Name Policy for further detail and explanation, please visit http://ssdocs.tethertools.com/name_policy.html Below is an overview of the Name Policy
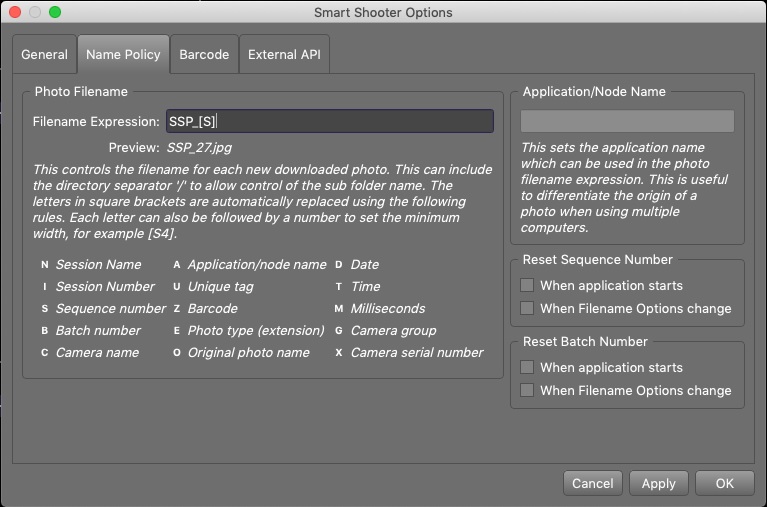
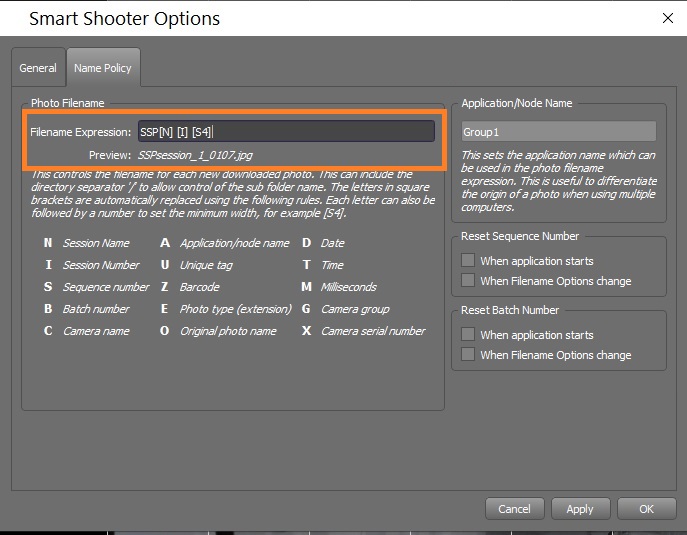
Photo Filename Each photo is assigned a unique file name, which you can control with the Filename Expression.
The Filename Expression is the text that specifies how each new filename is computed. This text is identified as letters and numbers inside square brackets. These parts are automatically extracted and replaced with dynamic information, by following the rules for each letter.
Insert the Letter within [ ] for the type of name you want in your file name.
See image below, Example: [N] is Session Name, [I] is Session Number, [S4] is a Sequence Number with 4 digits
Filename Expression Options & Rules Chart
Letter |
Meaning |
Description |
|---|---|---|
A |
Application/node name |
The name associated to the local GRID network node |
B |
Batch Number |
Continuous numbering associated with the camera in use, each image is numbered incrementally. When shooting RAW + Jpg, both file types will use the same number. |
C |
Camera Name |
Name of the camera currently connected and in use |
D |
Date |
Current date in YYYYMMDD format |
E |
Photo Type (extension) |
The file extension of the photo (JPG, NEF, CR2) |
G |
Camera Group |
Group name for the camera in use, if in use. |
I |
Session Number |
Unique and changeable. |
M |
Milliseconds |
The millisecond part of the current time between 000 and 999. |
N |
Session Name |
Unique and changeable. |
O |
Original Photo Name |
Camera generated file name |
S |
Sequence Number |
Sequentially numbering |
T |
Time |
The current time in the format HHMMSS. |
U |
Unique Tag |
A unique name, that can be changed in Filename Options. |
X |
Carmera Serial Number |
Serial number of the camera in use. |
Z |
Barcode |
The text from the last barcode that was scanned by the app. |
To view the full Name Policy for further detail and explanation, please visit http://ssdocs.tethertools.com/name_policy.html
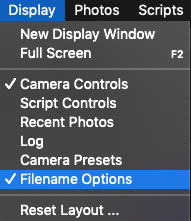
b. Display
Each option under Display acts as a toggle, turning it ON/OFF.
Options are:
New Display Window
Full Screen
Camera Controls
Script Controls
Recent Photos
Log
Camera Presets
Filename Options
c. Photos
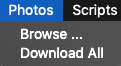
Browse, to where photos are stored on computer. Must have File Storage set to Disk or Both for images to save to computer.
Download All, Opens file dialog window, drill to folder where you want to download images.
d. Scripts
Choose a preset Script from the options.
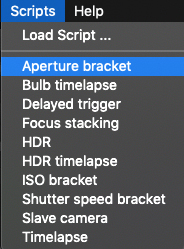
To control the Scripts, open Scripts Control by selecting Display > Script Controls.
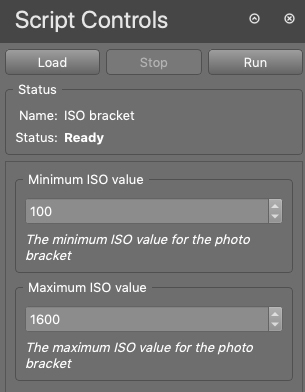
Smart Shooter will run the script according to the settings you have entered. If you need to stop a script while running, click Stop Script.
Custom scripts can be loaded when using Smart Shooter Pro. Information on creating custom scripts can be found here.
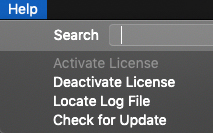
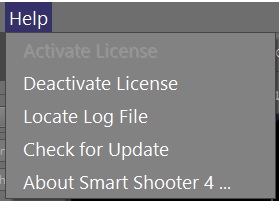
e. Help
Activate License: Will be grayed out after you have activated your license.
Deactivate License: A Smart Shooter Standard license can be used on up to three computers. Deactivate license to remove and move to a different computer, you will need to enter your license to activate.
Locate Log Files: Identifies where log files are located.
Check for Update: Scans computer for version.
About Smart Shooter: Shows version number, License status, License type and Copyright info. Smart Shooter is developed by Kuvacode.
Mac Version:
PC Version:
B. SUPPORTED CAMERAS
Listed by make and model with supported features.
Canon
Model |
Live View |
Bulb Mode |
Auto Focus |
|---|---|---|---|
Canon EOS R |
x |
x |
x |
Canon EOS Ra |
x |
x |
x |
Canon EOS R5 |
x |
x |
x |
Canon EOS R6 |
x |
x |
x |
Canon EOS R7 |
x |
x |
x |
Canon EOS R10 |
x |
x |
x |
Canon EOS RP |
x |
x |
x |
Canon EOS 1D Mark III |
x |
x |
|
Canon EOS 1Ds Mark III |
x |
x |
|
Canon EOS 1D Mark IV |
x |
x |
x |
Canon EOS-1D C |
x |
x |
x |
Canon EOS-1D X |
x |
x |
x |
Canon EOS-1D X Mark II |
x |
x |
x |
Canon EOS 5D Mark II |
x |
x |
x |
Canon EOS 5D Mark III |
x |
x |
x |
Canon EOS 5D Mark IV |
x |
x |
x |
Canon 5Ds |
x |
x |
x |
Canon 5Ds R |
x |
x |
x |
Canon EOS 6D |
x |
x |
x |
Canon EOS 6D Mark II |
x |
x |
x |
Canon EOS 7D |
x |
x |
x |
Canon EOS 7D Mark II |
x |
x |
x |
Canon EOS 40D |
x |
x |
|
Canon EOS 50D |
x |
x |
x |
Canon EOS 60D |
x |
x |
x |
Canon EOS 70D |
x |
x |
x |
Canon EOS 77D |
x |
x |
x |
Canon EOS 80D |
x |
x |
x |
Canon EOS 90D |
x |
x |
x |
Canon EOS 100D |
x |
x |
x |
Canon EOS 200D |
x |
x |
x |
Canon EOS 250D |
x |
x |
x |
Canon EOS 450D |
x |
x |
|
Canon EOS 500D |
x |
x |
x |
Canon EOS 550D |
x |
x |
x |
Canon EOS 600D |
x |
x |
x |
Canon EOS 650D |
x |
x |
x |
Canon EOS 700D |
x |
x |
x |
Canon EOS 750D |
x |
x |
x |
Canon EOS 760D |
x |
x |
x |
Canon EOS 800D |
x |
x |
x |
Canon EOS 850D |
x |
x |
x |
Canon EOS 1000D |
x |
x |
|
Canon EOS 1100D |
x |
x |
x |
Canon EOS 1200D |
x |
x |
x |
Canon EOS 1300D |
x |
x |
x |
Canon EOS 8000D |
x |
x |
x |
Canon EOS 9000D |
x |
x |
x |
Canon EOS Rebel SL1 |
x |
x |
x |
Canon EOS Rebel SL2 |
x |
x |
x |
Canon EOS Rebel SL3 |
x |
x |
x |
Canon EOS Rebel T1i |
x |
x |
x |
Canon EOS Rebel T2i |
x |
x |
x |
Canon EOS Rebel T3 |
x |
x |
x |
Canon EOS Rebel T3i |
x |
x |
x |
Canon EOS Rebel T4i |
x |
x |
x |
Canon EOS Rebel T5 |
x |
x |
x |
Canon EOS Rebel T5i |
x |
x |
x |
Canon EOS Rebel T6 |
x |
x |
x |
Canon EOS Rebel T6i |
x |
x |
x |
Canon EOS Rebel T6s |
x |
x |
x |
Canon EOS Rebel T7i |
x |
x |
x |
Canon EOS Rebel T8i |
x |
x |
x |
Canon EOS Rebel XS |
x |
x |
|
Canon EOS Rebel XSi |
x |
x |
|
Canon EOS Kiss F |
x |
x |
|
Canon EOS Kiss X2 |
x |
x |
|
Canon EOS Kiss X3 |
x |
x |
x |
Canon EOS Kiss X4 |
x |
x |
x |
Canon EOS Kiss X5 |
x |
x |
x |
Canon EOS Kiss X6i |
x |
x |
x |
Canon EOS Kiss X7 |
x |
x |
x |
Canon EOS Kiss X7i |
x |
x |
x |
Canon EOS Kiss X8 |
x |
x |
x |
Canon EOS Kiss X8i |
x |
x |
x |
Canon EOS Kiss X9i |
x |
x |
x |
Canon EOS Kiss X10 |
x |
x |
x |
Canon EOS Kiss X10i |
x |
x |
x |
Canon EOS Kiss X50 |
x |
x |
x |
Canon EOS Kiss X70 |
x |
x |
x |
Canon EOS Kiss X80 |
x |
x |
x |
Canon EOS M6 Mark II |
x |
x |
x |
Nikon
Limitations of Nikon D3xxx cameras The Nikon D3xxx range of cameras (including the D3000, D3100, D3200, and D3300) have limited capabilities during tethered operation. In particular, liveview is not possible with the D3000 and D3100, and although liveview is possible with the D3200 and D3300, it is not possible to zoom the liveview image or drive the focus motor. We recommend avoiding this range of cameras if more advanced tethering features are required.
Model |
Live View |
Bulb Mode |
Auto Focus |
|---|---|---|---|
Nikon Df |
x |
x |
x |
Nikon D3 |
x |
x |
|
Nikon D3S |
x |
x |
|
Nikon D3X |
x |
x |
|
Nikon D4 |
x |
x |
x |
Nikon D4S |
x |
x |
x |
Nikon D5 |
x |
x |
x |
Nikon D6 |
x |
x |
x |
Nikon D40 |
x |
||
Nikon D60 |
x |
||
Nikon D80 |
x |
||
Nikon D90 |
x |
x |
|
Nikon D300 |
x |
x |
|
Nikon D300S |
x |
x |
|
Nikon D500 |
x |
x |
x |
Nikon D600 |
x |
x |
x |
Nikon D610 |
x |
x |
x |
Nikon D700 |
x |
x |
x |
Nikon D750 |
x |
x |
x |
Nikon D780 |
x |
x |
x |
Nikon D800 |
x |
x |
x |
Nikon D800E |
x |
x |
x |
Nikon D810 |
x |
x |
x |
Nikon D850 |
x |
x |
x |
Nikon D3000 |
|||
Nikon D3100 |
|||
Nikon D3200 |
x |
||
Nikon D3300 |
x |
||
Nikon D3400 |
x |
||
Nikon D3500 |
x |
||
Nikon D5000 |
x |
x |
|
Nikon D5100 |
x |
x |
|
Nikon D5200 |
x |
x |
x |
Nikon D5300 |
x |
x |
x |
Nikon D5500 |
x |
x |
x |
Nikon D5500 |
x |
x |
x |
Nikon D5600 |
x |
x |
x |
Nikon D7000 |
x |
x |
|
Nikon D7100 |
x |
x |
x |
Nikon D7200 |
x |
x |
x |
Nikon D7500 |
x |
x |
x |
Nikon Z 5 |
x |
x |
x |
Nikon Z 6 |
x |
x |
x |
Nikon Z 6 II |
x |
x |
x |
Nikon Z 7 |
x |
x |
x |
Nikon Z 7 II |
x |
x |
x |
Nikon Z 9 |
x |
x |
x |
Nikon Z 50 |
x |
x |
x |
RICOH
Model |
Live View |
Bulb Mode |
Auto Focus |
|---|---|---|---|
THETA S |
|||
THETA V |
Sony
Note: When shooting with a Sony camera. Use the + and - buttons to make adjustments to Aperture, Shutter Speed, ISO, Exposure-Compensation - in this way you can (+) Increment or (-) Decrement the current values.
Storage Mode: Only “Disk” (the computer) is supported. Live View Zoom Region is not supported. Live View Manual Focus movement is not supported. Video Recording Start/Stop is not supported.
Model |
Live View |
Bulb Mode |
Auto Focus |
|---|---|---|---|
Sony a6000 |
x |
||
Sony a6100 |
x |
x |
|
Sony a6300 |
x |
||
Sony a6400 |
x |
x |
|
Sony a6500 |
x |
||
Sony a6600 |
x |
x |
|
Sony a1 |
x |
x |
|
Sony a7 |
x |
||
Sony a7 II |
x |
x |
|
Sony a7 III |
x |
x |
|
Sony a7 IV |
x |
x |
|
Sony a7C |
x |
x |
|
Sony a7R |
x |
||
Sony a7R II |
x |
x |
|
Sony a7R III |
x |
x |
|
Sony a7R IV |
x |
x |
|
Sony a7S |
x |
x |
|
Sony a7S II |
x |
x |
|
Sony a7S III |
x |
x |
|
Sony a9 |
x |
x |
|
Sony ZV-E10 |
x |
x |
C. EXTRAS
Default Settings SS4 default file saving is set to Disk (computer only). To change either go to File > Options > Default Settings or Storage in the Camera Controls Panel.
Smart Shooter will not overwrite an existing file If an existing file is found while saving a file, SS will append the new file name with a _1.
Presets A subset of the standard options can be saved to a preset. The preset saves a snapshot of the options of when it was created. Multiple presents can be stored, allowing the options to be changed quality just by switching between presets.
External API This feature is only available with Smart Shooter PRO. Please read http://ssdocs.tethertools.com/external_api.html for further information.
Keyboard Shortcuts
Key |
Description |
|---|---|
T |
Take a photo |
Z |
Take a photo on all connected cameras |
F |
Auto Focus |
R |
Run the currently loaded script |
A |
Select the aperture camera setting |
S |
Select the shutter speed camera setting |
I |
Select the ISO camera setting |
E |
Select the exposure compensation camera setting |
Q |
Select the photo quality camera setting |
M |
Select the metering mode camera setting |
W |
Select the white balance camera setting |
Up arrow |
Change the value of the currently selected camera setting |
Down arrow |
Change the value of the currently selected camera setting |